
My first layout using the kit - "new PJs" - documents an annual tradition we have. Last year Kevin received University of Louisville pjs while Blake's were the Indianapolis Colts.
 Since this was the first layout with the kit, I challenged myself to use up the MM frame embellishment that came with the gold foilage since it wasn't my favorite. I backed it with one of the Pink Paislee Santas (another item I really didn't like much) and ended up being very happy with how it turned out.
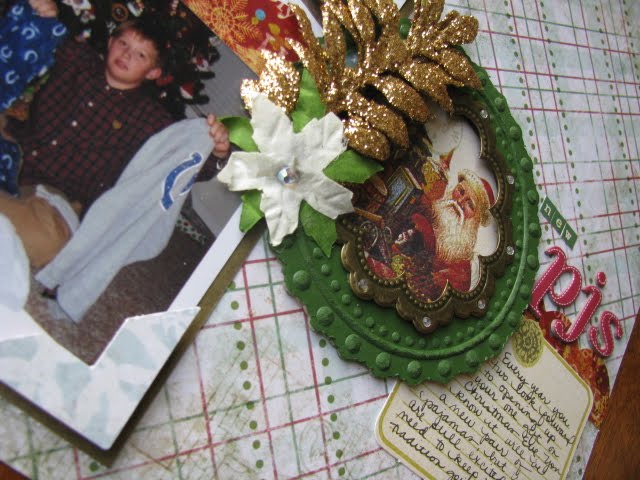 After I finished my next layout, I realized it didn't have a title. (!!!) ALL of my layouts have titles. But, I was really happy with the look of this one, so I didn't add anything to it.
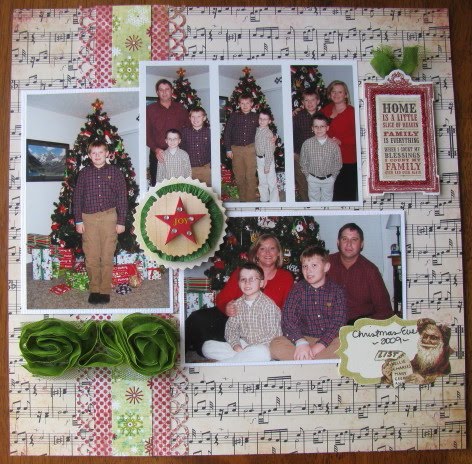 I added a few items to the NM kit for this one. I used some of the American Crafts rose trim in white, but I changed the color by misting it with Mr. Huey in Green Apple. I used a scrap piece I cut off behind the "home is..." MME die cut that I also added. These photos from last Christmas just make me happy.
 My next layout was completed for Noel's challenge blog challenge for "Outdoor Decor." I scrapped the outside of my house and also an "outside" tradition of leaving out "reindeer food."
 In addition to using the kit items, I also added a couple tags from Shabby Chic Crafts and a layered "home" sticker from MME. To finish off the layout, I traced "santa" with Glossy Affects.
 While scrapping, I realized we have a lot of traditions for Christmas. :) Another one is the boys each by one gift for the other. I had already made a 5x7 photo collage of last years exchange, so this year's layout was easy to scrap. I was inspired by a layout in the December '10 issue of Scrapbooks, Etc. by Lisa Truesdell.
 I sprayed my kraft background with Green Apple Mr. Huey and then added a couple Shabby Chic Crafts tags and some baker's twine to the layout.
  Forgive me for the awful photo of this next 2-page layout. I rushed to get photos of them before the holidays and now that I am looking at them, the pages are already in an album. This layout was inspired by a Vicki Boutin layout in the December '10 issue of Scrapbooks, Etc. I adjusted it to fit the sizes of photos I already had and mixed up the embellishments and title placement.
 I added a Shabby Chic Crafts tag and green star stickers/alphas by Jenni Bowlin to the kit I was using. I even worked in some rub-ons on this page. I RARELY ever use rub-ons anymore, but I love how they look against the kraft paper.
 "Christmas Morning" is a continuation of the last layout. No cropping was involved on these photos since I had printed two 6-up 5x7x and a 2-up 4x6.
 Again, I used rub-ons. Can you believe it? This was a super simple & FAST page to complete. I just added the "Christmas Morning" tag from Shabby Chic Crafts over the top of a MM embellishment to make my title.
Here's another super simple page. I went with my "go-to" design. I slightly cropped my photos and positioned them across the center of my page. Then I added strips of paper to give the look of crossing the entire spread.  My title starts on page one with the FP "All I want for Christmas is..." sticker and is completed with the Jillibean Soup corrugated alphas "gifts!" I added the alphas, a Shabby Chic Crafts tag, and some baker's twine to the kit.

 My title starts on page one with the FP "All I want for Christmas is..." sticker and is completed with the Jillibean Soup corrugated alphas "gifts!" I added the alphas, a Shabby Chic Crafts tag, and some baker's twine to the kit.
I used all of the We R Memory Keepers papers from the kit on this layout with photos from last year. I had a story to tell, so the ruled die cut paper was perfect.  I added some Shabby Chic Crafts tags and more Glossy Affects (on the holly berries).

 I added some Shabby Chic Crafts tags and more Glossy Affects (on the holly berries).
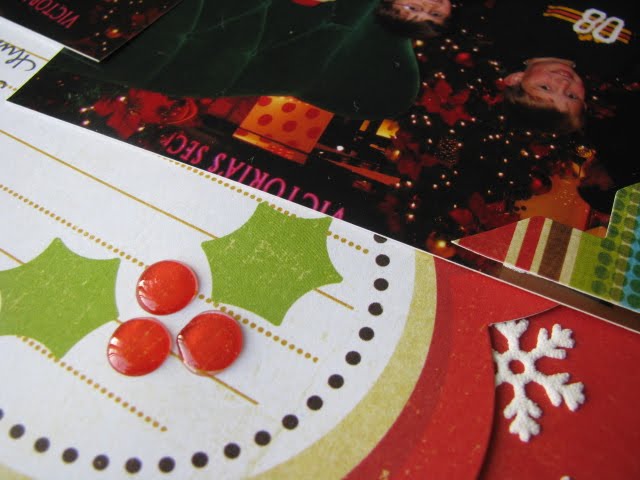
Last year was the first year the boys really wanted to help put the tree up (instead of just decorating it when it was ready). They were a big help. "O Christmas Tree" uses more of the WRMK papers.  Again, I added some tags from Shabby Chic Crafts and Jillibean Soup corrugated alphas. And there Glossy Affects add dimension to the tree on the round tag.
 I printed these photos of Blake from last Christmas at my parents' house as two 6-up 5x7 prints, but then cut them apart. I spaced them out in a 4x4 grid and filled in the empty squares with embellishments.

Again, I added some tags from Shabby Chic Crafts and Jillibean Soup corrugated alphas. And there Glossy Affects add dimension to the tree on the round tag. I printed these photos of Blake from last Christmas at my parents' house as two 6-up 5x7 prints, but then cut them apart. I spaced them out in a 4x4 grid and filled in the empty squares with embellishments.
I just added more Shabby Chic Crafts tags and the green star/alpha stickers by Jenni Bowlin to complete this page.  Next up, I did a 2-pager using more photos from Christmas Eve '09 at Mom & Dad's.
 Of course, I added more tags from Shabby Chic crafts and accented the heart on on of them.

 Next up, I did a 2-pager using more photos from Christmas Eve '09 at Mom & Dad's.
 Of course, I added more tags from Shabby Chic crafts and accented the heart on on of them.
I finished the layout by tying some baker's twine through a couple ribbons.  My final layout (so far...) gave me a change to try out my new Martha Stewart around-the-page border punches. I added a layered sticker (quote) from MME and some AC pompom trim.
 And, you knew I was going to use more tags from Shabby Chic Crafts, didn't you? I just love them!
 If you haven't already checked out Shabby Chic Crafts, do so now. They have a great variety of tags, but more importantly, they offer great customer service.
 My final layout (so far...) gave me a change to try out my new Martha Stewart around-the-page border punches. I added a layered sticker (quote) from MME and some AC pompom trim.
 And, you knew I was going to use more tags from Shabby Chic Crafts, didn't you? I just love them!
 If you haven't already checked out Shabby Chic Crafts, do so now. They have a great variety of tags, but more importantly, they offer great customer service.
 I have a few assignments coming due, so it was time to put the Noel Mignon kit away. I hope to have more things to share with you soon.
Enjoy the rest of 2010!

 For further dimension, I added glossy accents to the circles on the border sticker strip. Glossy accents is becoming my new "go-to" scrap item!


 To complete my page, I cut up one of the windowpane chipboard pieces to make photo corner for the outside edges of a few of my photos. And I used a striped piece of patterned paper to make journaling strips.


 Then I added strips of patterned paper below them. To finish off my strips, I cut the Maya Road transparency doilies from the kit in half and lined them up for a fancy scalloped border.


 For some finishing touches, I added my title using the "December" tag from We R Memory Keepers and a Jillibean Soup red corrugated number. Since the kit didn't include any ribbon, I decided to adhere one of the Bazill Basics Nostalgic Clear Vintage Buttons from the kit over the hole in the tag. I also added some random "x" stitches around the page. The ledger paper was perfect for journaling.
  The window chipboard shapes in the kit reminded me of how much I enjoy peeking inside windows (from my car!) during the holidays. So, I selected a couple shots of Blake's tree in his room from last Christmas. So I'd have plenty of room for my window to stand out, I separated my page into two sections.
  I misted the window shape and a valance with red mist and backed the window with a piece of patterned paper to make it stand out a bit. I added some paint to the top of the valance to resemble snow and added baker's twine to attach a key from the kit. I really liked the bracket shape on the Bo Bunny sticker sheet from the kit, but wanted to use a Girls' Paperie pattern. To get the bracket shape, I cut the bracket out of the sticker sheet, and pulled the negative shape off the sticker sheet. I adhered it to the patterned paper I wanted to use and cut around the bracket shape. My title is another mix of Jillibean Soup and October Afternoon.


 Finally, I created a non-holiday card by using the rose patterned backside of one of the patterned papers. I kept this one simple iwth just a strip of patterned paper and one of the Making Memories metal accents from the kit.